How to Build Academic Website for Research Group in 2021
A recipe to get static web generation, collaborative editing, continuous integration and automated deployment all together free of charge
In this blog, I will introduce the technology stack that I used to build an academic research group’s website. To give you a preview of the result, please visit our lab’s website. Following this recipe, you will get a website where group members can collaboratively make edits and post blogs to the website by writing Markdown on GitHub directly and the changes will be automatically built and deployed to a basic web hosting server (often comes free if you are affiliated with the school) provided by university, without any human actions. You can optionally also set up a two-stage deployment pipeline with a dev and a prod stage to maximize stability and availability.

Here are the technologies used, all of which come free of charge (assuming you don’t get crazy traffic like 10,000,000 clicks/day):
- Hugo static web generator
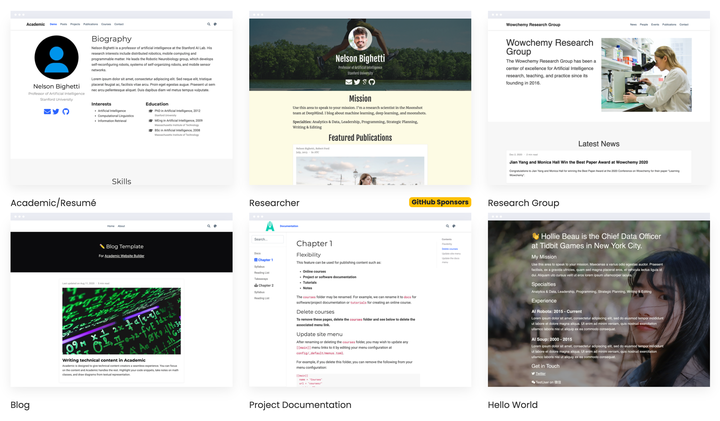
- Wowchemy research group template
- Github
- CircleCI
- Simple, basic virtual host provided by university
- (Optional) Netlify
Why build a lab website?
Publicity and exposure matters in academia. The first thing many researchers do when they hear our name is to google us and our research lab. Our website and the lab’s website play an important role in deciding people’s first impression on us. This is particularly true in the CS community, where people tend to put more emphasis on their digital appearance.
Design Choices
Content Requirements
Let’s first think about what kind of content we want to display for a research group:
- About, introducing what the lab do, research interests, etc.
- People, showing member’s headshot and social links (personal website, Google Scholar, LinkedIn, etc.)
- Publication, showing a list of publications, sorted chronologically
- Blogs, to allow group members introduce their research work
Technology Requirements
Let’s then consider the technologies upon which we want to build our website. Let’s first think about how a badly designed group website can cause problems in the future:
- website is too hard to update –> group members don’t want to spend time updating it –> information become outdated and inaccurate –> bad impression to visitors
- website can be modified by only one person –> people don’t even want to start creating a website because no one wants to take the burden in the future
- website can be modified by only one person –> duty becomes too heavy for that one person –> s/he just quit maintaining the thing –> (same as above)
- website can be modified by only one person –> other group members feel guilty to bother that one person too much –> they stop writing blog posts, making updates and giving suggestions
- website breaks down all the time –> visitors cannot get information
- website is too slow to load –> visitors just leave
- website is too expensive to design/host –> advisor won’t agree
OK, that was a lot of problems. But let’s parse it out. What are the requirements in terms of technology? We need a website that:
- is easy to update information and post blogs
- can be collaboratively edited by many people
- is stable
- is fast
- is cheap, if not free
These content and technology requirements motivate the choice of the technology stacks above:
- Hugo static web generator: generates a static website, which is fast to load, stable, almost impossible to hack, and doesn’t need any software to be installed on the hosting server (as opposed to a full-stack requirements demanded by a non-static solution like WordPress).
- Wowchemy research group template: provides templates for all the things listed in the content requirements.
- Github: provides a platform for group members to easily, collaboratively make edits.
- CircleCI: automates the build and deployment process, making it one click away from committing the change to seeing the changes live.
- Simple, basic virtual host provided by university: provides a free hosting location for the static website, (optional) used for
prodstage. - (Optional) Netlify: provides another free hosting location for the static website, (optional) used for
devstage.
Implementation
Hugo + Wowchemy
To install Hugo, visit their installation guide. If you are on macOS and you use Homebrew, it is as simple as:
brew install hugo
For Wowchemy, take a look at their provided templates.

You can see that Wowchemy is really built with the Academic users in mind. They have something to offer for both personal and group web page.
Fork and clone the “Researcher Group” starter repository and follow their guide on getting started to customize your page.
You can spin up a locally hosted version of the website by
hugo server
and view your website live at localhost:1313 in your browser. One cool feature that Hugo provides is live compile: Whenever you make a change in the config or content files, the Hugo backend will automatically detect that change and immediately reflect that change at localhost:1313, without any need to re-compile/restart. I find this feature very pleasant to use during development.
GitHub + CircleCI + University-provided virtual host
GitHub is a great solution to store our source files as well as to version control. Remember, our goal in the future is that group members can collaboratively edit the website, posting blogs, etc. If a bad edit happens and/or the website crashes, we need to make sure we can quickly roll-back to the latest working version so that our website is not down. Also, because Wowchemy makes it so easy to edit the content, it would be very convenient if the group members can make changes directly on GitHub, which hopefully can encourage more active contributions.
CircleCI is a continuous integration / continuous delivery (CI/CD) tool. Remember that before our website goes active, it needs to be compiled by Hugo. Also remember that we want to enable group members to make edits on GitHub and not worry about compile, deploy, etc. Therefore, some platform needs to take the responsibility of compiling and deploying. Without a CI tool like CircleCI, this would require the web admin download the newest changes, compile locally, and upload to server, which would quickly become tedious given that there might be many edits made by the group members. CI tools help us automate these jobs. It also means we don’t need to have a computer by our side to do this job, as the CI platform provides a temporary server and the necessary environment on demand. Best of all, these all come free (assuming you don’t make a huge amount of edits per day)!
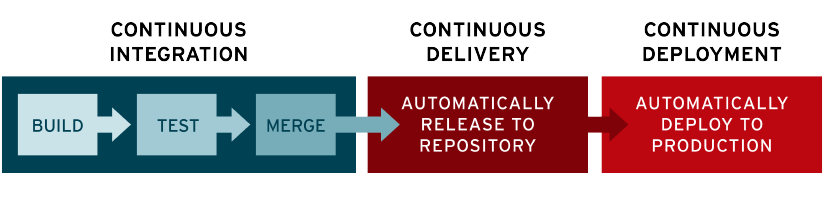
In our case, we use CircleCI for two things: 1. Compile the Hugo source files 2. Deploy the compiled files to a university-hosted server.
We can follow this doc to spin up CircleCI for a GitHub repo. We can ignore the config.yml file CircleCI generates, as we will write our own config.yml.
In config.yml, which lives at .circleci/config.yml in the repo, we specify two jobs: build and deploy. This script tells CircleCI the build environment and commands that is required to get our Hugo website compiled and deployed. The two jobs combine to form a workflow call build_and_deploy (note that deploy only happens for the GitHub branch prod).
version: 2.1
jobs:
  build:
    docker:
      - image: cibuilds/hugo:latest
     # more environment variables used in this script are stored in the project setting page
    steps:


      # checkout the repository
      - checkout

      # install git submodules for managing third-party dependencies
      - run: git submodule sync && git submodule update --init

      # clean hugo stuff
      - run: hugo mod clean

      # build with Hugo
      - run: mkdir -p workspace
      - run: HUGO_ENV=production hugo -v -d workspace/hugo_output

      # Persist the specified paths (workspace/echo-output) into the workspace for use in downstream job.
      - persist_to_workspace:
          # Must be an absolute path, or relative path from working_directory. This is a directory on the container which is
          # taken to be the root directory of the workspace.
          root: workspace
          # Must be relative path from root
          paths:
            - hugo_output

      - run: ls -lah

  deploy:
    docker:
      - image: cibuilds/hugo:latest
    working_directory: /home/circleci/hugo
    environment: # more environment variables used in this script are stored in the project setting page
      HUGO_OUTPUT_PATH: /home/circleci/hugo/public
    steps:

      - checkout
      - attach_workspace:
          # Must be absolute path or relative path from working_directory
          at: /tmp/workspace

      - run: ls -lah

      # install necessary packages
      - run: sudo apt install expect

      # copy files
      - run: expect upload_to_server_with_duo_2fa.expect $DEPLOY_USERNAME $DEPLOY_PASSWORD $DEPLOY_JUMP_HOSTNAME $DEPLOY_HOSTNAME /tmp/workspace/hugo_output $DEPLOY_DEST_PATH

workflows:
  build_and_deploy:
    jobs:
      - build
      - deploy:
          requires:
            - build
          filters: # only deploy when branch is prod
            branches:
              only:
                - prod
Note in the deploy job, we call a script called upload_to_server_with_duo_2fa.expect. Below we give the full script of upload_to_server_with_duo_2fa.expect. We use it to copy the compiled website files to the server destination where we host our website. Specifically this is a script used to 1-click finish the Duo 2-factor-authentication enforced by university servers. Note that we also added a jump server in the SSH command because otherwise the destination server would require VPN to be accessed.
expect is an awesome command line tool. As its name suggests, it “expects” some prompt from an interactive command line program, and for different prompt, the expect program will return different input as specified. In our case, the rsync program interactively asks for SSH login information and a DUO 2-factor authentication request ("Passcode or option (1-3):").
#!/usr/bin/expect -f

set DEPLOY_USERNAME [lindex $argv 0]
set DEPLOY_PASSWORD [lindex $argv 1]
set DEPLOY_JUMP_HOSTNAME [lindex $argv 2]
set DEPLOY_HOSTNAME [lindex $argv 3]
set HUGO_OUTPUT_PATH [lindex $argv 4]
set DEPLOY_DEST_PATH [lindex $argv 5]


spawn rsync -av --delete -e "ssh -J $DEPLOY_USERNAME@$DEPLOY_JUMP_HOSTNAME" $HUGO_OUTPUT_PATH/ $DEPLOY_USERNAME@$DEPLOY_HOSTNAME:$DEPLOY_DEST_PATH

puts "### connecting to host server... ###"

set timeout 180
expect {
    timeout {
        puts "Connection timed out"
        exit 1
    }

    "yes/no" {
        send -- "yes\r"
        exp_continue
    }

    "assword:" {
        send -- "$DEPLOY_PASSWORD\r"
        exp_continue
    }

    "Passcode or option (1-3):" {
        send -- "1\r"
        exp_continue
    }

}

# catch if any error happens: https://stackoverflow.com/questions/3299502/how-to-return-spawned-process-exit-code-in-expect-script
catch wait result
exit [lindex $result 3]
This script can be run by:
expect upload_to_server_with_duo_2fa.expect <DEPLOY_USERNAME> <DEPLOY_PASSWORD> <DEPLOY_JUMP_HOSTNAME> <DEPLOY_HOSTNAME> <HUGO_OUTPUT_PATH> <DEPLOY_DEST_PATH>
where the arguments mean the following:
DEPLOY_USERNAME - the login username for the server
DEPLOY_PASSWORD - the login password for the server / jump server
DEPLOY_JUMP_HOSTNAME - the hostname for the jump server
DEPLOY_HOSTNAME - the hostname for the server
HUGO_OUTPUT_PATH - path to the Hugo compiled output (on the build server)
DEPLOY_DEST_PATH - path on DEPLOY_HOSTNAME to where we want to copy the compiled website files to
These arguments should be stored as secrets. CircleCI uses environment variables to store secrets. Here is the doc on how to set them on CircleCI. This is a safe way to store these sensitive secrets as CircleCI does not allow you to view the environment variables once it is set. You can only delete and create a new one if you want to change environment variable.
(Optional) An alternative to CircleCI + University Server: Netlify
Netlify is an all-in-one solution to both compile and host a Hugo website. We can follow this doc to set Netlify up with a GitHub repo. It pretty much does the same thing with CircleCI + University Server. Netlify also provide a generated domain (URL) for us to access the website.
Staging: prod and dev
For a website open to the world, we want to ensure the website is up all the time. However, with frequent and collaborative editing, it is possible that a new edit might introduce unintended effect or even cause the site to crash. It is therefore important to set up staging for our website. In other words, we need to have a separately running website to test out all new changes and make sure they are good, before we hit the button to publish the new changes to the world.
The way we implement this is simple. We created two branches in the GitHub repo: prod and dev. As the name suggests, prod, meaning production, is the version that the world sees; dev, meaning development, is the version where we stage and test our newest changes.
We configured Netlify to use the dev branch. So whenever there is a new change pushed to the branch dev, Netlify will re-build the website and publish the new version to the URL it provides.
On CircleCI, we have set up config.yml so that it only deploys to the university server when the branch is prod.
The workflow we follow is as follows: Group members commit their changes to branch dev, see their changes live at the Netlify URL, make sure everything looks good and finally create a pull request on GitHub to merge the newest changes from branch dev into branch prod. Once the pull request is merged, CircleCI will grab the newest changes, build and deploy to the university server. And now our new edits are live to the world!